Measuring Variables in Chemistry (DP IB Chemistry): Revision Note

Measuring variables in chemistry
You need to know how to accurately measure variables to allow the collection of valid and high-quality data
Sometimes, you will be required to make a decision as to what piece of equipment to use based on which is the most appropriate for that particular task
Measuring mass
Mass is typically measured with a digital balance accurate to two decimal places.
Always tare (zero) the balance before weighing
In chemistry, mass is usually recorded in grams (g), though the SI unit is kilograms (kg):
1 kg = 1000 g
Measuring the volume of liquids
The method used depends on how accurate the measurement needs to be.
Measuring cylinders
Used for approximate volumes.
Graduated with volume markings.
Typically range from 10 cm3 to 1 dm3
Volumetric Pipettes
Most accurate for measuring a fixed volume (e.g. 10 cm3 or 25 cm3)
A calibration mark indicates the volume; align with the bottom of the meniscus
Burettes
Most accurate for measuring a variable volume (e.g. 0–50 cm3)
The scale runs top to bottom (0.00 cm3 is at the top), so always read from the top down
Whichever apparatus you use, you may see markings in ml (millilitre) which is the same as a cm3
Equipment used to measure the volume of liquids

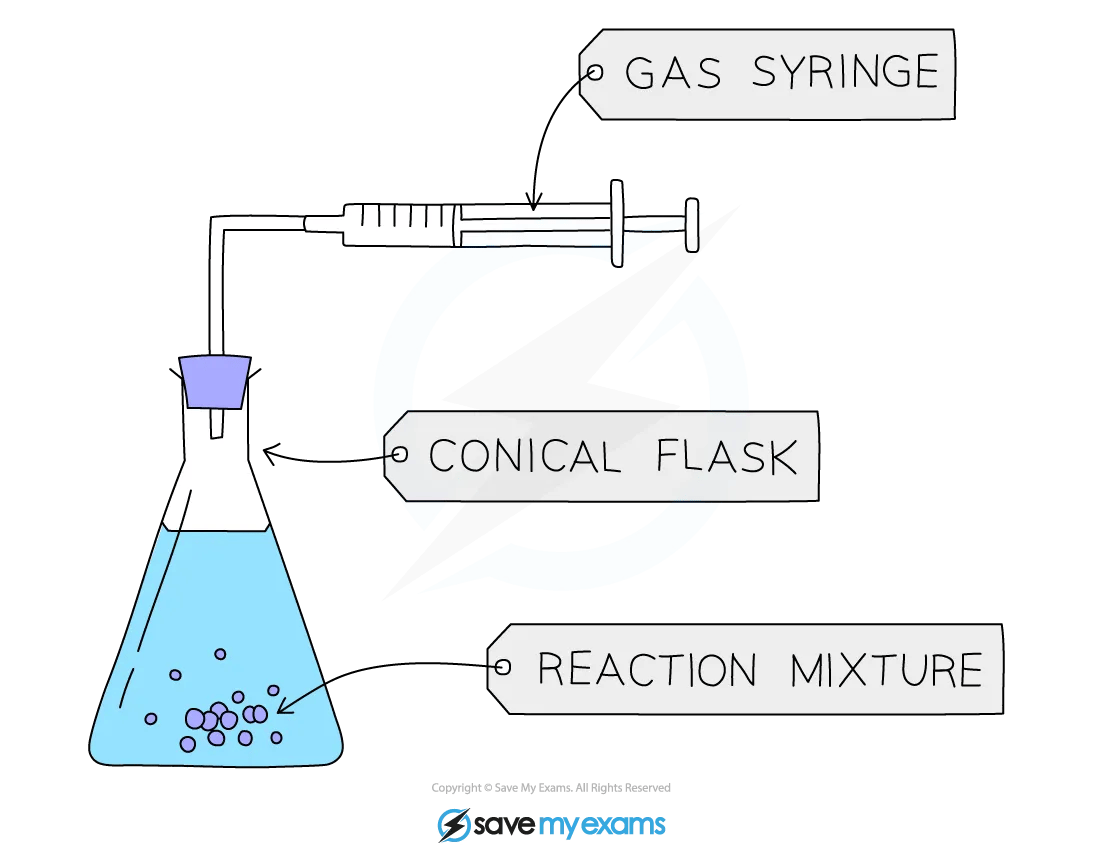
Measuring the volume of gases
The volume of a gas can be measured by collecting it in a graduated measuring device.
A gas syringe is the most common apparatus used
Alternatively, a measuring cylinder or burette inverted over water can be used if the gas is insoluble in water
If the gas is denser than air and coloured, it may be collected upright in a cylinder by downward displacement of air
Measurement of the volume of gas using a gas syringe
Measuring time
Time is measured using a stopwatch or stop-clock, usually accurate to 1–2 decimal places
The most common units are seconds and minutes, though hours may be used for very slow reactions (e.g. rusting)
1 minute = 60 seconds
An important factor when measuring time intervals is human reaction time
This can have a significant impact on measurements when the measurements involved are very short (less than a second)
Examiner Tips and Tricks
Be careful when recording time not to mix up seconds and minutes in the same table
If a table heading shows Time / mins and you record a stopwatch display of 1.30, meaning 1 minute and 30 seconds, that is wrong as it should be 1.5 mins
To avoid any confusion, if the time intervals are less than a minute, it is best to change the recorded units to seconds
So the 1.30 stopwatch display would therefore be recorded as 90 seconds
Measuring temperature
Temperature is measured using a thermometer or digital temperature probe
Laboratory thermometers:
Use the thermal expansion of a liquid (e.g. alcohol or mercury) in a capillary tube
Commonly give readings to the nearest 1 °C or 0.5 °C
Are simple, robust, and inexpensive
May take longer to equilibrate and are less precise than digital options
Units are typically recorded in degrees Celsius (°C)
Digital temperature probes:
Use electronic sensors (e.g. thermistors or thermocouples) to detect temperature
Often have a higher precision, reading to ±0.1 °C or even more accurate
Provide fast, real-time readings
Often used in data logging and continuous monitoring
Can reduce human error and are ideal for remote or automated experiments
Measuring length
Rulers can be used to measure small distances of a few centimetres (cm).
They are able to measure to the nearest millimetre (mm)
The standard unit of length is metres (m)
Larger distances can be measured using a tape measure
Many distances in chemistry are on a much smaller scale, for example, a typical atomic radius is around 1 x 10⁻¹⁰ m, so cannot be measured in this way
Measuring length

Measuring the pH of a solution
pH can be measured using an indicator or a digital pH meter
Digital pH meters work by:
Using an electrode with a thin glass membrane that allows hydrogen ions to pass through
These ions affect the voltage, which is converted into a pH value
This provides precise and quantitative results, often to two decimal places
They are suitable for accurate pH monitoring in research or industrial settings
Indicators are substances that change colour depending on the pH of the solution.
Only a few drops are needed as they are intensely coloured and highly sensitive.
Indicators may be natural or synthetic
Natural (e.g. litmus, red cabbage extract):
Contain a mixture of plant extracts
Useful across a broad range of pH
Provide approximate pH values
Synthetic indicators (e.g. phenolphthalein, methyl orange):
Have sharp, defined colour changes at specific pH ranges
Suitable for titrations where clear endpoints are required
Universal Indicator
A wide range indicator made from a blend of indicators
Gives approximate pH readings across the full pH scale (pH 1–14)
Colour change is matched to a colour chart
Colours can vary slightly between manufacturers, so the correct chart must be used
Colours of universal indicator

Examiner Tips and Tricks
pH probes offer higher precision and accuracy compared with indicators, so they are more suitable for most applications
Indicators with a sharp colour change are still a suitable choice for use in titrations as they give a clear endpoint, are simple to use and give valid results
pH meters may respond more gradually to changes in pH so may not provide a clear, sharp signal at the endpoint
Measuring electric current
Current is measured using an ammeter
Ammeters should always be connected in series with the part of the circuit you wish to measure the current through

Digital or analogue?
Ammeters can be either
Digital (with an electronic display)
Analogue (with a needle and scale)
Analogue ammeters typical ranges are 0.1 - 1.0 A and 1.0 - 5.0 A for analogue ammeters
Always double-check exactly where the marker is before an experiment
If the marker is not at zero, you will need to subtract this from all your measurements
They should be checked for zero errors before using
They are also subject to parallax error
Always read the meter from a position directly perpendicular to the scale
An analogue ammeter

Digital ammeters can measure very small currents, in mA or µA
Digital displays show the measured values as digits and are more accurate than analogue displays
They’re easy to use because they give a specific value and are capable of displaying more precise values
However, digital displays may 'flicker' back and forth between values and a judgement must be made as to which to write down
Make sure the reading is zero before starting an experiment, or subtract the “zero” value from the end results
Digital ammeters should be checked for zero errors
A digital ammeter

Measuring the electric potential difference
Potential difference (voltage) is measured using a voltmeter, which can be:
Analogue: scale and needle display
Digital: electronic numerical readout
Voltmeters are always connected in parallel with the component being tested
They measure the difference in electrical potential between two points in a circuit
Analogue or digital?
Analogue voltmeters are subject to parallax errors so need to be read at eye level to avoid misreading
The common ranges are from 0.1–1.0 V or 0–5.0 V, though this may vary
They should be checked for zero errors before use:
Always double check exactly where the marker is before an experiment, if not at zero, you will need to subtract this from all your measurements
An analogue and digital voltmeter

Digital voltmeters can measure very small potential differences, in mV or µV
Digital displays show the measured values as digits
This reduces parallax error
Highly accurate and easy to use, but may:
Flicker between values; a judgment may be needed to record a stable value
Digital voltmeters should be checked for zero errors
Make sure the reading is zero before starting an experiment, or subtract the “zero” value from the end results

Unlock more, it's free!
Join the 100,000+ Students that ❤️ Save My Exams
the (exam) results speak for themselves:

Was this revision note helpful?