Microscopy (AQA GCSE Combined Science: Trilogy: Biology): Revision Note
Exam code: 8464

A brief history of the microscope
Microscopy techniques have advanced over time, enhancing our understanding of sub-cellular structures
17th century: Development of the first light microscopes
Light microscopes use light and lenses to magnify specimens, allowing visualisation of cells and large sub-cellular structures like nuclei and vacuoles, often with the aid of stains
Their design has evolved to improve magnification and resolution over time
Resolution is the ability to distinguish two points that are close together, which is what lets you see finer detail
20th century: Introduction of the first electron microscopes
Electron microscopes use electron beams instead of light, providing much higher resolution and magnification due to the smaller wavelength of electron beams
Electron microscopes
Electron microscopes have higher magnification and resolving power than light microscopes
They can therefore be used to study sub-cellular structures such as the mitochondrion
They have also helped biologists develop a better understanding of the structure of the nucleus and cell membrane
Examiner Tips and Tricks
When discussing the advantages of electron microscopes, be careful with your use of language. Use terms such as "higher resolution", "higher resolving power" and "can see more sub-cellular structures" rather than "cells appear bigger" and "higher zoom". If asked for two advantages or differences, give one about magnification (higher magnification) and one about resolution (higher resolution, so more detail or more sub-cellular structures can be seen). "Higher resolution", "more detail" and "see more sub-cellular structures" all count as the same single mark.
Magnification calculations
Magnification is calculated using the following equation:
Magnification equation triangle
An equation triangle can help with rearranging the equation
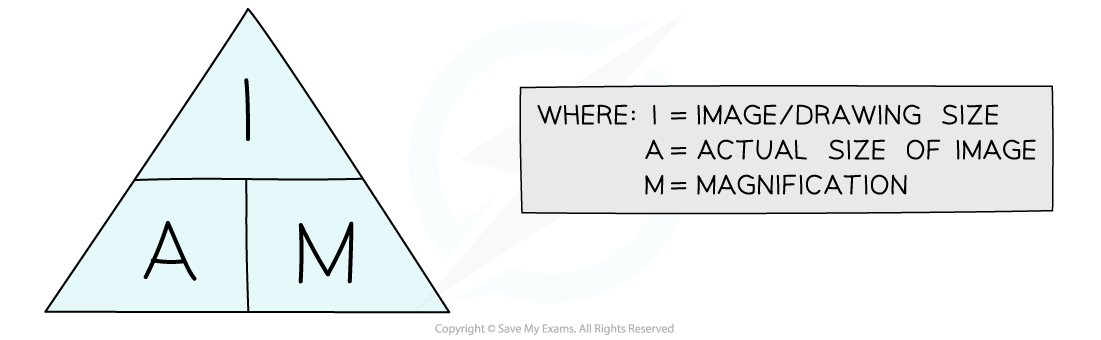
The equation can be rearranged to form:
Examiner Tips and Tricks
Magnification calculations are easy to lose marks on. To ensure you do not lose marks in the exam:
Always check the units that have been given in the question – if you are asked to measure something, most often you will be expected to measure it in millimeters rather than in centimeters
Convert the units - convert any units that don't match before entering numbers into the equation
If you need to recall the equation, write it out in words: magnification = size of image ÷ size of real object. An equation triangle on its own earns no marks. You can use it to help you rearrange, but don't give it as your answer.
Remember, magnification does not have any units and is just written as ‘× 10’ or ‘× 5000’
Converting units
Converting units in biology
You may be given a question in your biology exam where the measurements for a magnification calculation have different units
You need to ensure that you convert them both into the same unit before proceeding with the calculation (usually to calculate the magnification)
Worked Example
The actual thickness of a leaf is 2000 µm, but the image size of the leaf in the diagram is 50 mm.
What is the magnification of the diagram?
Answer:
Step 1: Convert the units to determine the size of the real object
The image size is given in mm, so convert the size of the real object to mm
Remember that 1 mm = 1000 µm
So the actual thickness of the leaf is 2 mm, and the drawing size is 50 mm
Step 2: Determine the magnification
So the magnification is × 25

Examiner Tips and Tricks
Watch out for the units you are given in the answer-prompt space. Remember the following to help you convert between mm and µm, and between mm and nm:
1 m = 1000 mm
1 cm = 10 mm
1 mm = 1000 µm
1 µm = 1000 nm
To go from cm to µm, convert cm to mm first (× 10), then mm to µm (× 1000), so 1 cm = 10 000 µm
Units | Larger → smaller | Smaller → larger |
|---|---|---|
m ↔ mm | x 1000 | ÷ 1000 |
cm ↔ mm | x 10 | ÷ 10 |
mm ↔ µm | x 1000 | ÷ 1000 |
µm ↔ nm | x 1000 | ÷ 1000 |

Unlock more, it's free!
Join the 100,000+ Students that ❤️ Save My Exams
the (exam) results speak for themselves:

Was this revision note helpful?
Build on this topic